I guess this isn't necessarily a Christmas Light Tree, it could be just another cool lamp for my house like THIS ONE I made awhile ago. Regardless of it's holiday appropriateness it's a fun project that uses Christmas LED light strings and some stuff you can buy at the craft store. I decided to make this after seeing some of these in a shop at Cannery Row in Monterrey and I liked how they looked, and didn't like how much they cost!
 |
| Homemade LED Light Tree |
The one that I made is about 24" tall and sits in a 5" diameter vase. It was made using 3 strings of Phillips Battery Powered Micro LED Light strings (2 white and 1 blue) that you can get at almost any store these days that stocks Christmas and Holiday lights (it is that season after all!). The vase is metal with a glass insert and has cool a looking design cut in it that the light shines through. Below is a picture of some of the parts that I used.
In addition to the LED lights and vase a lot of the parts that I used are made by a company called Panacea Products Corp and are sold in crafts stores for making floral arrangements. Panacea makes a lot of stuff but the most important part for this project is the Stem Wrap Tape. The nice thing about using this is it's made of cloth, it sticks to itself and when you are done what you have looks natural.
 |
| LED Light Tree Materials (Partial) |
Above is a picture of some of the things I used. the Stem Wire could be a coat hanger or any other stiff wire and the lights could be any kind but as I mentioned I think the Stem Wrap tape is the most important. Anyway on to how I made this. (there is a video of all the steps at the end of this post)
The first thing that I did is I cut the aluminum stem wire into several lengths and grouped them into 3's with each piece of the 3 the same length. I then twisted each group of 3 into wire ropes using a hand drill and a vise. This is pretty think wire and after twisting it together I used of for the trunk of the tree.
 |
| Twisting Wire With A Drill |
Below is a progression of how it went. After twisting the aluminum wire together I added some of the smaller stem wire to make branches and held the trunk together with electrical tape. In the below picture I added some electrical wire but after doing that I decided it wasn't necessary and took it out.

Now once it is twisted together and formed into a tree looking thing, wrap it all up with one layer of Stem Wrap Tape to hide all the metal looking wires. The trick to doing this is you want to start at the top of the tree and/or the tips of the branches and work down to the trunk. That way the last layers of the tape (that tend to unwrap themselves) are at the bottom. Be sure to wrap it tight and keep it to a thin layer because you have to wrap it all again when the lights are put on it. One more thing to mention is when you are wrapping down you will eventually get to a branch that isn't wrapped yet. Keep wrapping past that branch and continue a couple of inches past it toward the trunk. When you get around to wrapping the unwrapped branch it's tape will overlap the first branch's tape and help hold it down.
 |
| Tree Wrapped With Stem Wrap Tape |
Once the tree is all wrapped up with the Stem Wrap Tape it should look something like the picture above. Looks great doesn't it?... Maybe... Yes??
The next thing that I did was to cut up all those fancy LED lights strings that I had! I decided to cut them because the tree obviously has a lot of branches and the light strings are just that, one long string. What I needed for the tree was several strings of lights that are the same length as the branches that all connect together where the trunk is. To maximize the number of lights on each branch I decided to 'double them up' and have 2 short strings of lights per branch. One tricky thing to cutting the light wires is to know where to cut and to only do this with battery powered LED lights (not the AC powered lights). The other tricky thing is to know how to hook them back together once you have cut them.
The Phillips Battery Operated Micro Light strings that I used have 18 LED's in the string. Between each LED there is an alternating pattern of 2 then 3 wires connecting each consecutive LED. The reason for the different number of wires (and an even 18 LED's per string) is each pair of LED's is electrically connected in series with all the pairs connected in parallel. Have a look at the picture below to see what I mean.
 |
| LED Christmas Light Wiring |
In the top sketch in the picture above you can see that there are 2 wires on each end by the words "From Battery Pack" and "To More Lights". Between the 2 LED's in the top sketch there are actually 3 wires between the 2 LED's. The electrical equivalent of the wiring is shown in the bottom sketch. Be sure that you know what you are doing before you go cutting up your Christmas lights and only do this on LED battery powered light strings. Bad things can happen if you don't understand what is going on.
I cut my light strings where there were only 2 wires between the LED's and I cut them into strings of 4 LED's each. That left me with 2 LED's per string (because there are 18 total LED's per sting) that were unused. I'll save those for future projects. If this is confusing email me at ottobelden@yahoo.com or leave a comment!
Once I had all the strings of 4 lights each cut I stripped the wires and reconnected them to the battery pack. LED's need to have the positive and negative of the battery connected correctly but in this case hooking them up backwards won't damage them. So I just tried hooking each one of them up and if it didn't work I reversed the connections. In the video I'm cutting the LED string with the power on so you can see what is happening but I don't recommend that!
 |
| Rewired Battery Powered LED Lights |
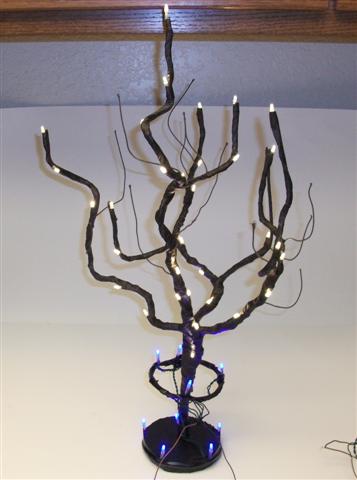
As I mentioned at the beginning of the post I started with 2 sets of white LED strings. After cutting the strings into groups of 4 I had 2 LED's left over that I'm not using so combining those I ended up with the picture above. There are a total of 16 LED lights grouped into 4 'branches' of LED's. The next step was to put those LED strings onto my tree and wrap it all up with the Stem Wrap tape.
Just like the first time that I wrapped up the tree, I started at the top of the tree and worked down. This is a little tricky and takes some patience but it's not that hard. I started by wrapping an inch or so of the tape on the end of a branch and without stopping the wrapping laid the LED string onto the branch and wrapped it all up. This was the most time consuming part of building this thing but going slow and wrapping tightly and evenly is key.
The next step was to cut the blue LED' light string the same way as I cut the white ones above. I attached a stiff wire ring to the trunk of the tree that is small enough to fit in the vase and at a position that is below the top of the vase when the tree is placed inside. Have a look at the video at the end of this post to see what I mean. I also cut a round disc of wood and drilled a hole in the center that the tree trunk fits in. This wood disc of course has to fit in the vase too! The wood disc supports and centres the tree in the vase and along with the wire ring provides a place to attach the blue LED's. Below is a picture of what it looks like at this point.
 |
| LED Light Tree |
After mounting the blue LED's to the wood disc and the wire ring all I had to do was drill a hole in the vase and hook up the wires. To diffuse the blue LED's I lined the inside of the vase with thin foam that I used in my Homemade Dust Collector. Here is a video showing all the steps I explained above set to some strange 'music' that I wrote. Enjoy!
Hello there!
ReplyDeleteI really want to try this, but do AC powered lights work the same?
Hello,
ReplyDeleteI do not recommend AC lights for something like this. They are usually hot (or warm at least) and AC power just isn't all that safe. The wiring for AC lights is different than for LED lights, what I wrote above applies only to LED's. The LED lights that I used I got at Target for $6.00. If you have any questions at all please let me know!
Otto
Hello! Your creation is great. I really like it. I want to try it. Thanks for sharing it.
ReplyDeletechristmas led lights
Great Achievement ! Thank you for sharing the tutorial for making of led Christmas tree. I will certainly try it for coming Christmas..Looking great :))
ReplyDelete123neonsigns,
ReplyDeleteThanks! I hope it works out for you, let me know!
- Otto