Links to stuff on this blog

Use the Site Index of Projects page link above for an easier way to find stuff on my blog that you might be looking for!

Sunday, May 30, 2010

Another SolidWorks Doodle...

It is another long holiday weekend and I have been spending my time messing around in the garage and on the computers. I decided to do another narcissistic SolidWorks picture not so much because I am in love with myself but because I was a little bored!!! (Kidding) This is in the same vein as THIS picture that I did awhile ago - have a look.
  
The real reason that I did this was because I use SolidWorks all day long during the week to create and design mechanical stuff and those kinds of things tend to be a bit sterile and tedious. Here is my chance to do something a bit more fun and artistic. SolidWorks isn't really set up for fancy pictures like this without a whole lot of extra software add-on's and I thought that drawing something in perspective and really exaggerating it would be fun. Anyway here is the picture:
  
  
Pretty cool isn't it?! Well maybe not but I think it is!!! I wanted to give it the appearance that the letters were on two sides of a wall... like the corner of a wall drawn in 2 point perspective.
 
Here is more or less how I went about making it. I created 2 reference planes to sketch on that are at an angle of 86.63degrees. Actually I started out with them at 90 degrees but later adjusted it to 86 because it looked better.
  
Once I had the planes set up I sketched and extruded a triangle on each one that is 10" tall and 20" from the base to the 'top'.


Above is what one triangular side looks like. Once I had the triangle extruded I added some layout lines that originate at the 'top' of the triangle (laying on it's side). The text tool in SolidWorks doesn't really work for putting letters on something like this so I had to sketch each letter by hand using the layout lines as a guide and extrude them.

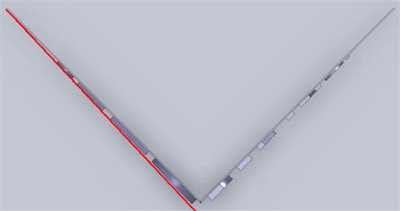
Once I had both triangles done and the text extruded I made a cut that ' shaves' off ' the text back to the tips of the triangles. Below is a top view of this thing with a red line that I sketched in where the cut was made. I added the red line in MSPaint because I am too lazy right now to restart SolidWorks and do a screen shot showing the cut ;-)

 
Once I had the cut done to both sides I set the two triangular extrusions to a transparent state with their edges shown. A little blue background and that is it.

Astute readers will have noticed that I set this picture as the background image for the title of this blog. To get it to fit into the area up there I had to scale it a bunch of times in MSPaint which messes up the resolution and adds all that grainy look to it. I'm sure there is a better way to scale the pictures but I don't have the software. If you know of a better way to make images smaller without distorting them so much let me know!

Saturday, May 22, 2010

Panasonic Fax and Phone

It seems that everyone that knows me, knows me pretty well so when they have something that they don't want they give it to me. This weeks not so interesting blog entry is about just such a thing! What was given to me was a Panasonic fax and phone system. Most people these days don't use fax machines and I am one of them so as soon as I got it I thought "That darn thing is probably chock full of cool stuff!!!" I took it home and I put it in my garage right next to all the other stuff in there...
  
Today turned out to be the day to open it up and marvel at all it's internal wonders. Otto Jr. and I grabbed a couple of screw drivers and went to town on this thing. It only lasted about 10 minutes under our intense pulling, unscrewing and otherwise breaking.
  
  
Many times people ask me "Why is it you just take this stuff apart that people give you?" The answer to that is obvious "Do you know how much crap people give me and how much room all that junk takes up?!?" I take it apart not only because there is neat stuff inside these types of things but also because once broken into it's constituent parts it all takes up so much less room. Another reason that I take it apart is because yes of course I want my own reality TV show but no I don't want that show to be an episode of Hoarders.
  

Above is a picture of most of the neat things that came out of it. The most useful is probably the power supply that powered this contraption. The power supply (not in the picture above) has 115VAC in and +5,+8 and +24 VDC out so it looks to be pretty useful. I'll probably put it into it's own box with a switch and use it to power other fun experiments. I was hoping that the motors in this would be DC motors but unfortunately they are stepper motors. Stepper motors are cool and useful for some things but generally they are a pain to use in home made stuff because they require some control logic - you can't just hook a battery to them to make them spin.
  
By comparing the pictures above you can see that there isn't much left once Otto Jr. and I take something apart. I will actually throw away the PC boards as well once my son is done playing with them. Basically the power supply and the gears are all that I'll keep.
  
Lastly the other bit of insight I get when taking stuff like this apart is how it was put together. I am a designer by profession and I get paid to figure out how to design things so that they will be easy to assemble, service and cost effective to fabricate. Fax machines, printers and pretty much everything else is always interesting to me in that regard, especially if it is broken. How stuff doesn't work is the best way to figure out how to design things that do work.

Sunday, May 16, 2010

Double Barreled Sawed Off Shotgun

This project was Otto Jr's idea and it turned out to be a fun one. He was looking at an old table leg of round wood the other day and he thought that it would make a cool barrel for a shotgun. Then he thought that it would be twice as cool if he were to saw it in half and turn it into a double barreled shotgun barrel(s)!!! Great Idea!!!
 
Here is a picture of how it turned out when done:


We started this project by looking on line at pictures of various styles and types of sawed off shotguns then we did a sketch of what we more or less wanted it to look like. Then we got down to the business of cutting the wood and shaping the parts.
  
 
As with all the projects that he and I make together I try to let him do most of the cutting and sanding. The larger tools and cuts like the band sawing I'll take care of while he watches.
  
 
The pivoting part of the gun where it opens for loading/reloading access to the chambers we did with a tongue and groove joint and a nail. To get the thickness that is required for the back of the gun we stacked up some of the wood that Otto Jr is cutting in the picture above and glued/nailed it together. I then sawed out the general shape and he filed it down with a rasp.
  
 
Once we had it all together we nailed the wooden barrels onto the stock and drove in the nail for the pivot. We drilled undersized pilot holes for the nails to avoid splitting the wood and added some glue to most of the parts to keep it all together.
  
 
This turned out to be a fun thing to build this afternoon. Eventually we might decide to paint it and use it in a Halloween costume but for now it was something to do and kept us busy.

Sunday, May 9, 2010

Some More (odd) Stuff On Another Rainy Day...

It has been another rainy day here in the Bay Area and I spent some time cleaning the garage and replacing light bulbs around the house. While enlightening the environment I thought I'd share a couple of small projects that I built recently. Actually one of them I built recently and the other one I made in November 1983 so its rather old. like me. Anyway the first one I'd like to share is something that no house should be without. That is a light in the bathroom specifically a light illuminating the toilet. You can look on line and find a lot of toilet specific lights that you can buy but I thought it would be more fun to put one together with parts that I have laying around. Here is a picture of this wonderful creation:
 
 
For creative reasons I left the toilet out of the picture but you can probably guess that it is to the immediate left of the picture. The key part to this is the short extension cord that fits so nicely between the plug and the toilet paper roll area. This cord is exactly 3 feet long and I know that because it had a warning label on it saying "Warning: this extension cord is 3 feet long". The cord came with an 'under the cabinet' type halogen lights you get at the hardware store and I'm not sure why they had to put that label on it... 
  
Before building this I had decided that I needed more light in the bathroom to navigate in the late hours of the night while trying to take care of business. I bought the little green glowing night light at the end of the cord for that but it wasn't bright enough to see what I was doing (or where I needed to go) when plugged into the wall. That was when I made the decision to attach it to the end of the extension cord! Great! Unfortunately when I hung the cord over the edge of the counter to get it near the toilet it started sliding around and I couldn't get it pointed in the right direction.
  
I thought "What I need is a bathroom attendant like they have in high class bathrooms to hold the light for me". Unfortunately I can't afford to hire someone to do that so I did the next best thing and got a couple of plastic action figure toys that Otto Jr. had. One of them I think is the "Yellow Power Ranger" and I really really really really really really wish that they made a "Brown Power Ranger" because that would have been perfect to have a "Yellow" and "Brown" holding a toilet light... or maybe a "Mister 1" and "Mister 2"... Anyway I got a piece of scrap wood and screwed the yellow guy to it and found another figure in the old toy box and added him diligently standing at attention next to the yellow dude. The two of them together help shed some light on what goes on in the wee hours of the morning in the bathroom.
  
On to something else and completely unrelated...


Here is a picture of a small cedar jewelery or trinket box that I made a long time ago. I only include it here because it's one of the very first wood projects that I made that I still have. It still has that really nice cedar smell to it and the glue still holds it all together.

Sunday, May 2, 2010

Strange Signs

I have been really really busy and have not had a lot of time to do creative things in the garage lately so I'm going to write a short post about something odd I saw. Awhile ago I was working evenings and each night I had to drive to my place of employment and pass a big industrial complex. One of the entrances to this place has a big gate and a driveway for trucks to enter. I took a picture of it:
  
  
Nothing too exciting about that! I don't pass by this place too often and I have never seen any traffic through the gate. What made me decide to take a picture of it was the two signs on either side. You can see that the one on the right clearly says Speed Limit 5 MPH but what isn't as obvious is the other smaller sign. Here is a close-up shot of the smaller one:

 
That one struck me as being a bit odd, especially considering that the sign on the right allows you to go a little bit faster. What does a person do when faced with a situation like this??? Take a picture of it and post it on the internet - naturally ;-)