Links to stuff on this blog

Use the Site Index of Projects page link above for an easier way to find stuff on my blog that you might be looking for!

Sunday, February 28, 2010

Samsung HT-DB6000 -> Linear Slide Mechanism (D.I.Y.)

Today's wonderful and exciting Blog entry is a detail of a linear slide mechanism that Otto Jr. and I made today. This is for a much larger project that he and I are working on the details of which will be posted at a later date. Suffice it to say that this was the source of fun in the garage for the afternoon! I know your first thought must be "why make a slide when you can buy them?" The answer is "it's more fun this way!" Anyway on to the project...
  
The first thing that we had to do was find a suitable piece of metal to be used as the "base" of the slide. This was easy because I have a ton of metal bits laying around the garage. In that pile of a ton of bits we happen to run across the skeletal remains of a Samsung HT-DB6000 DVD Home Theater System, 5 Disc DVD changer, 500 Watt Stereo system. This system was broken and I took it apart a long time ago... trashed the parts that were not so interesting and saved the stuff that was. In fact some of what was inside this sucker made it into a power supply that I made. Click HERE for a recap of the power supply (scroll down a bit for the power supply). Anyway on to the project...
  
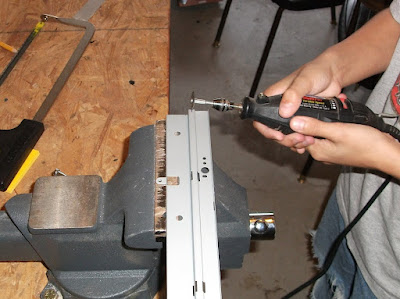
There was a piece of metal that used to hold the insides to the outsides in a box and Otto Jr. and I decided it would work well... with some slight modifications. Part of it was bent into a slight 'U' shape about a half inch wide. We cut the remainder of it off with a dremel. Remember you can click on any picture for a bigger view!
 
  
Above is a picture of Otto Jr. starting the cut. The part that we are going to save at this point is the side with the holes. Once Otto Jr. had got it going I stepped in to tear through it. The metal is electro-galvanized sheet metal, steel about .06" thick. Nice material...
  
 
The cutting went pretty well and was really loud with a lot of sparks and metal shavings etc... just the kind of thing I was looking for. If you are going to make something like this it's important to make a lot of noise and dirt and if you are really into it maybe a little smoke and fire as well otherwise it's not a very satisfying experience. We decided against the smoke and fire on this one and just made extra sparks and dirt to make up for it.
  
 
Who at Samsung would have guessed that there product would be so useful? Above is a picture of the rough cut. After making this cut we freed the piece that we were interested in with a perpendicular incision that joined the one you see in the picture. Once done Otto Jr managed to clean up all the burrs and rough edges with a file. He is getting pretty good at this stuff...
  
  
Observant readers will notice that in the picture above there appears to be a piece of while material in the vise and not the metal that you were anticipating seeing. Actually the metal is in there along with the plastic! Wow this is getting exciting!!! Yes because the metal piece is 'U' shaped it's not so easy to clamp it in the vise without damaging the U. It is important to preserve the U shape because that is what the other piece of metal will slide in. To prevent the U from being crushed in the vise while filing we slipped a piece of Delrin that I had laying around (actually the Delrin piece coincidentally is part of a Linear Slide that I have laying around... but using that for this project wouldn't be fun!) that happened to fit in the U.
  
Once that part was nice and smooth we took a flat piece of aluminum sheet and cut out a strip to be used as the sliding part. This piece was just under 1/2" wide when we were done with it. It started off a bit bigger and to get it ready for cutting Otto Jr straightened one edge with a file (see pic below) and then he cut it with a hack saw. He is getting pretty good at this stuff!
  
 
OK once he had it cut into a strip and deburred it was ready to put into action! I don't have a picture of the actual sawing that went on but trust me it was dirty, noise and fun just like the first parts of this project. There are a couple more parts that also had to be messed with to get this thing to work. First is we needed something to prevent the slide part from sliding all the way out on either end. We managed to do this by bending up a tab on the inner slide part and installing a plate for it to catch on. To keep it constrained in the other direction we bent up part of the U piece. Have a look at the pictures below and you will see what I mean.
  
  
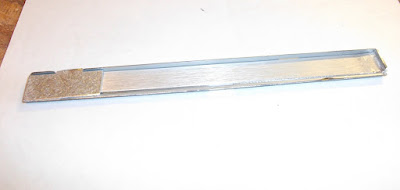
In the picture above you can see a flat piece of aluminum on the left hand side... this is what catches the tab that we bent up on the slide part. In the above picture the slide is retracted or "all the way in" in layman's terms. You can get an exciting view of the tab in the picture below!!!!
  
 
That is it folks!!! The above picture shown the slide extended and you can get a pretty good view of the tabs that we bent up in the U piece. This will be held together for now with some tape until the balance of the design is refined and more materials procured by the procurement department (Translation: I'll dig through the garbage until I find more stuff to use) For a complete set of measured drawings of this project email me and I'll laugh at you.
Saturday, February 20, 2010

Multiplication (more about nothing)

I think that I mentioned in another post that I have been playing around with multiplication tables. They make neat pictures and really handsome tablecloth patterns as well as matching place mats. The below picture is a multiplication table mod 257 that I made in Excel.  Cool pattern if you click on it to enlarge it and look at it...

 
The really interesting - not that they make cool place mats but that the numbers all end up being what they are (cool if you are a geek). When you make a multiplication table like this using a modulus that is prime the rows of the table (or columns) end up being permutations of all the possible numbers in the field (modulus - 1). Below is a multiplication table mod 5 without the 0's row / column because those are all 0's obviously.

     1   2   3   4
1   1   2   3   4
2   2   4   1   3
3   3   1   4   2
4   4   3   2   1
 
I'll write more about this later if I feel like it.

HERE is a link to more about this stuff with a fun table that you can put in your own modulus and choose which operator you are interested in (+ - X /). HERE is a link to the home page for that link that has a lot of interesting math related puzzles and other fun stuff.
 
Anyway that is about it... more later.

Monday, February 15, 2010

Not a whole lot to write about... so I'll keep this short.

As the title says there is not a whole lot for me to write about this week. I try to update this Blog once a week or so but I have not really hit a 'mile stone' in any of my projects worth writing about... One thing that I did do is work on a picture for my Blog Template. I didn't add it to the template because after looking at it I don't think it will work too well in the overall visual scheme. I have included the picture below because I know everyone likes pictures. Also I included it because pictures are more interesting than my boring writing style which has been compared to  Lorem Ipsum on occasion. Here is the picture for your enjoyment: (and an exciting LINK to Lorem Ipsum)
 

I created this little collage in SolidWorks, it's my favorite CAD program and a continuing source of employment for me. (Click on the picture for a better view - it's worth it!!!) The planetary gearbox is from a bicycle project that I was working on a few months (a year now??) ago that never made it past the conceptual stage. The concept there was to create a novel way to add motor power to pedal power summing the two for a speedy and pleasurable biking experience. After messing around with it and building some working scale models I opted for the Electric Wheel Hub approach. You can click HERE for a post on that project. Interestingly that post also had the words "nothing much to write about" in it and the reader was asked to focus on the pretty pictures - much like this post. I guess I am repeating myself a bit but the old saying "stick with what works" may apply... Anyway back to the picture. I added a few other things in there as well that pertain to this overall Blog - the wood pieces cut at odd angles, a bolt and of course a wrench to adjust the gears. I thought that some circuits, binary numbers, strange formulas and a drill bit add to the overall projection, and fill in space. The revolved pot / vase looking thing was a neat idea but after I did a model of it it looked really boring. The cross section helps add some interest and the idea is to reflect the lathe work that i do. Click HERE for a link to various turned wood things that I have done. I thought for fun I'd add the robot leg model that was used in construction and calculation of the robot (LINK) that I did... the robot is still out there in the garage awaiting time for me to work on it. I have some ideas and no time right now to hook it up and play with it but like so many other projects once the weather warms up and I have time...
  
I did do some work on the TABLE that I am messing around with... well stripping paint off of anyway. I did do some of that today actually. One discovery that I did make is Klean-Strip KS-3 Premium Stripper pretty much burns holes right through those blue Nitrile gloves so don't use them if you are using Klean-Strip KS-3 Premium Stripper! Actually it's not that bad, it takes some time for the stripper to work through the glove so you have a few minutes of stripping fun before you start to feel that ominous burning sensation. The cool thing about doing this on a hot day is your hands sweat so much in the gloves that when you take them off it pretty much neutralizes the burning. I would post a new picture of the table but it would be just as boring as the last picture which you can see by clicking HERE. The table base looks pretty much the same but with a little less paint on it. Have a look at that picture and use your vivid imagination (close your eyes if necessary) to imagine it with less paint. That is exactly how it looks now.  I think because this time I pretty much followed the instructions on the paint stripper can and worked in the warm sun it took off even more paint. Now the table is ready for sanding. I cleaned the base off with rags and water once I was done with the stripper stuff. The can recommends using mineral spirits to get the stripper off but I don't have any so I used water. There is a thin film of dried paint / stripper goop all over it but that should sand off nicely. What I am going to do with this table base I am not sure but because sanding will take some time I have time to figure something out. As I mentioned in other posts I am considering a cantilevered top for it but now I am not sure. The nice thing about working on something when you don't have a real plan or time frame for finishing it is you are never in a hurry to get anything specific done. This is strategy that has worked well for me over the years but in saying that I'm not endorsing it nor is it meant to be taken as investment advice.

Lastly there is all the certifiably crazy Excel crypto math stuff that I have been doing. I could add some updates to that as I have been playing around with it over the last week... but again there isn't a whole lot to mention. I have some new ideas and they have given me the opportunity to write barely functional Visual Basic code that just manages to do what I want it to do.  If I had anything interesting to write about I would - believe me. One thing I can say is I have been playing around with multiplication tables that use multiplication Mod a prime number. These are cool and fun and interesting and neat and all that stuff but I don't have any working code examples worth mentioning... in following the above stated "when you don't have a real plan or time frame for finishing something you are never in a hurry to get anything specific done" I don't have anything to post.
  
I suppose I could mention here that daylight savings is coming up in a hurry so I have made it a priority to clean the garage so once it's warm and sunny in the afternoon I can get back to cutting and drilling stuff. So there you go another post about nothing....

Sunday, February 7, 2010

Microsoft Excel Help #VALUE! (asking for it not offering it)

The weather continues to be cold and rainy so I have not spent much time in the freezing cold garage working on my table. To keep myself occupied in the warmth of the house I have been playing around with Excel again... I know these posts about math, Excel and cryptography stuff are boring but it's my Blog so I'm going to write about them! Recently I was trying to do something that I thought would be pretty simple and straightforward - take a value in a cell that is 32 bits long and break it into four 8 bit (byte) sized pieces. As I am sure I have mentioned before I am not all that great of a programmer and I kind of hack my code to get it to work but this seemed simple enough for even me to do it. After all, I have done this sort of thing in the past with 16 bit values, splitting them into 2 bye numbers so I thought that doing it with a 32 bit value would be easy, just the same thing but more of it. Here is a piece of Excel Visual Basic Code that I tried (it didn't work):
  
Function BYTESPLIT(Var As Double, Place As Byte)
' Parse out bytes of values from a 32 bit number
' December 2010 http://ottobelden.blogspot.com
Dim A As Double
Dim B As Double
Dim C As Double
Dim D As Double
A = Int(Var / 16777216)
B = Int(Var / 65536)
C = Int(Var / 256)
D = Var And 255
  
OK it seems straight forward enough doesn't it? This is how I have done this in the past with smaller numbers and it has worked. In essence, get the number that you want to split into bytes, in this case Var, divide the value by 2^X where X is the number of bits that you want to shift to the right. Shifting to the right makes the upper 8 bits turn into the lower 8 and is the byte value that I want. Once shifted assign that to a new variable A B C or D in this case, output those values and you are done. Because this is a 32 bit value that I am interested in I'm using 2^24 = 16777216 to shift Var to the right 24 bits and assign that value to A. This will take the upper 8 bits, shift them all the way down to the right and give me the value. I'm using 2^16 = 65536 to shift 16 bits and 2^8 = 256 to shift 8 bits. Finally for the last value which would be the lower 8 bits of the 32 bit number I am performing a logical And function with the value of  255 (eight 1's) which should just clear the upper 24 bits leaving just the lower 8 assigned to the variable D. None of this is anything that I came up with, this is all pretty straight forward programming. I have done this exact thing before with 16 bit numbers and it has worked great....
  
Here is the problem, this all works fine until the upper most 32nd bit (or Most Significant Bit) is a 1. When it's a one A, B and C all work fine but D is messed up and I get the #VALUE! error in the spreadsheet. Again I am not a programmer but here is what I think is happening. (If you are a programmer please let me know what I am doing wrong!!!)
  
The Double data type in Excel is a signed floating point data type that is 8 Bytes long. A signed number means that the left most bit in there is for a +/- sign and the remaining bits are for the number itself. This is where my problem is (I think). If I put a 32 bit number in the spreadsheet like 3235686432 the upper 8 bits of this number are 11000000. That is fine in the spreadsheet and also fine if I shift those bits to the right as I mentioned above. The 1 on the far left is part of the number and not interpreted as a +/- sign. When I try to perform the logical And to clear all the upper most bits that 1 is making Visual Basic think it's a negative number and it fails to do the And. I believe this is what is happening because if I put a 31 bit number in there effectively making the upper left bit a 0 then everything works. As another test I removed the line D = Var And 255 from the Function and A, B, and C all work and return the correct values so I'm sure the problem is in the D = Var And 255 line.
  
In other languages like C and C++ you have data types that you can declare that are unsigned so all the bits are the number, the number is always positive so no need for bit to keep track of +/-. Visual Basic doesn't have that option for any of it's data types apparently, at least on line searches and reading the help files don't say anything about it. I tried various things like rotating the bits then dividing, setting the Double data type (recasting?) to an integer etc... nothing seems to work.
  
If anyone reading this knows what I am doing wrong please let me know!!
  
Not to be stopped in my spreadsheet fun I figured out a work-around. I'm not thrilled with it because I would like to get the Function to work but here is the work-around. I created another function that just does the logical And like this:
Function TEST(Var As Double)
TEST = Int(Var And 255)
End Function
This function just takes the value of Var and does the logical And to it. Now what I did to get the 4 byte values of a 32 bit value is perform some of the math in the Excel spreadsheet instead of in the function itself.  For the upper three bytes I could have used the above first BYTESPLIT function and omitted the code that gets the value for D but I decided for consistency to do it all in the spreadsheet.
To get the upper most 8 bits I don't need the TEST function I just put =INT($D$7/16777216) in the cell where I want the upper most bits and $D$7 is the 32 bit number. 
To get the next bye of numbers I do something similar: =TEST(INT($D$7/65536)) this does the division shifting the bits and then the function TEST clears the upper 8 leaving the second byte.
To get the third byte I did just like the second =TEST(INT($D$7/256)) but divided by 256 to shift 8 bits instead of 65536. Again the TEST function clears with a logical And and I get the right value.
For the last pesky lower 8 bits I used this: =MOD($D$7,256). This uses the MOD function to take the remainder after division of the 32 bit value in $D$7 and returns the lower 8 bits.
  
Once I got this work-around to work I thought great! I'll just change the BYTESPLIT function line D = Var And 255 and replace it with D = Var Mod 256 but that returned #VALUE! as well... It seems that the Visual Basic compiler just doesn't like to do some math functions on signed values.
  
Again if anyone knows a way around this to get it to work in VB I'd like to know.