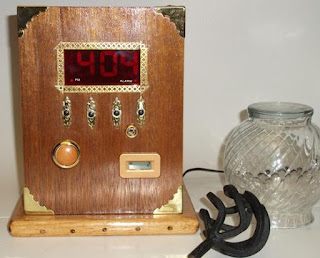
I have made some more progress on the digital alarm clock repackaging hack that I wrote about in the previous couple of posts. I am going for an antique look with the digital clock in there which reminds me a bit of the Steampunk stuff that I have seen, kind of a mix of old technology and new stuff. I'm not sure if it's going to end up looking like it's steam powered but then again a lot of the Steampunk stuff doesn't look steam powered to me. Anyway I have made some progress and here is a picture of how it looks now:
If you compare the above picture with how it looked last week (HERE) you can see some interesting differences. One is I have stained and varnished the box with polyurethane wood stain and varnish. Also I have added some brass 'adornments' to the face of the box. Under the clock face there are 4 buttons that are for setting the clock time and the alarm time. The two middle buttons are the up/down time set and the other two for the time and the alarm. To the left is a cabinet knob that is attached to a spring loaded pull mechanism that I made and it acts as the snooze button when you pull it. There is also a small switch to the right that turns the alarm on and off right above the 'hour meter' that keeps track of the elapsed time that the clock has been plugged in. I'm not sure the value of the elapsed time meter but it looks neat. Around the clock face is some brass 'hatching' that is used in model railroad building for bridges etc...
The other two items on the right are the glass spiral bowl and the egg shaped spiral thing that I mentioned I found some time ago. These two items are going to go on the as yet to be constructed top of the box that I am planning on making. I want the glass bowl to sit upside down on top of the box with the egg shaped thing spinning inside. To do this I need to find a motor and a gearbox that will spin the egg slowly around... I think that will look a lot better and more interesting than just a plain flat top.
The last item that I want to add is a light source to shine into the glass bowl and the spiral egg thing. What I am going to do for that is take a cheap LED night light that has a light sensor and put it inside with the light shining up into the bowl. If it is easy I'll use the light sensor to also turn the egg motor on and off when it gets dark. Anyway that is the plan right now... I may change that all around later.
Above is a picture of the cabinet knob putt switch that I made up. The knob is on the right and one of those little lever arm micro-switch's is on the left with it's mounting screws hot glued nice and tight. When you pull the knob it actuates the switch and the snooze timer starts. Last but not least in the above picture you can see one of those 'decorative catches' you can get at the hardware store. They are used as snap locks on small boxes, but in this case I drilled a hole in the catch (on the left) and used it as a washer for the push buttons... I did this for each button. That gives the buttons a nice old fashioned look... and now I have 4 latches that are missing catches.
That sums up the progress on the clock.


Wow that came out really cool! It does look kind of steampunk!
ReplyDeleteNice write up, and cool alarm clock project. And thanks for the pull-switch idea - I think I'll use something similar for the power switch on a steampunk computer case I'm working on.
ReplyDeleteAnonymous,
ReplyDeleteThanks for checking out my blog. I'm glad you found some of it useful. The 'putt' switch (I meant to write pull) works pretty well, kind of like a ball shooter knob on a pinball machine. I was thinking at the time to use several switches and 'bumps' or detents on the shaft like washers maybe? Depending on how far out I pull the shaft it would actuate different switches. Just a thought if I build something similar again.
- Otto