Hello!
Yes I know that I said in my last post that I wasn't going to post again in Blogger... I decided to post one last time because of several emails that I have received about why I am done with the New Google Interface and Google in general. Here is why I hate Google and the Blogger interface that they have destroyed.
I'm not going to elaborate much so here is the simple explanation in no particular order:
1) The New Interface Is Hard To Read: The new Google interface is all white space with black text making it hard on the eyes especially in low light, which is how I like to use the computer in the evening. I can't easily see what I am typing. The eye strain is obvious (unless you work for Google). Why do this, let's make it hard for everyone to read!!!!!
2) The menus are down the left side instead of across the top, a very unnatural place to look for stuff. Don't we all gravitate to the top of the window to look for "File" or "Edit" or any other common task? It's become natural to scan the top of the page or window to look for the options that are available... let's "Save" what we are doing (look to the top of the window); "Edit" the text or font (look to the top of the window)... Or... "I want to do something... it should be in the Tool's menu.... at the top.... where the hell is it????... not at the top!!! It's down the side!!!".... Why???
3) All the menu selections are now different. OK I get it, lets take what used to be at the top and put it down the left side of the window... But wait, you didn't do that did you? What used to be a simple click at the top is now buried in some complicated maze of stupidity in your "improved" left hand side bar menu system. Why?? Please tell me why you would do this?
4) Login page. The "blogs I follow" info is bigger and takes up more screen space than my own blog information when I log in. Why is that? Did I log in to see what my buddies are writing or did I login in to create a new post. This is after all about what I want to write about.
Google think tank: "Let's put all the stuff our user's friends are writing about on our users home page because we think our user wants to see that"... When I log in I want to see what is going on with my blog first, everyone else can wait until I'm ready to click on something (CLICK AT THE TOP) and see what other Bloggers are writing about.
Why can't I see on my own login page my own Blog info? Why???
- Side note: Blogging is a Web Log about me (or you) want to write about. Blogs that I follow are secondary, in other words when I log in TO MY BLOG I expect to see info about MY BLOG and not other people, I can and will get to them later (Unless I use a Google product, because then I have to see everything BUT then things I want to see).... WHY?????
5) Scroll bar and Omnibar. Do you use Google chrome? Good luck if you do. Chrome has a very stupid and annoying scroll bar that is inverted in relation to every sane person in the world (unless you are a idiot). The scroll bar is "dark" where you have to click to scroll, exactly backwards from every other software product I have ever used.
Here is what this amounts to:
Google engineer says " Lets be different and mix it up a bit, lets invert the colors on the scroll bar, everyone will love it"...
A real world example: "Let's reverse the gas and brake pedals in the car we are building, everyone will love it"
Insert frustration, car crashes, cuss words and...
6) The Google Omnibar.... lets not even talk about it.... one word: WHY????? Fill in for me what I typed yesterday??????? REALLY????????
7) Another thing about Google and in this case Andriod... Here is an example from my phone right now:
Today is Thursday July 5th at 5:11pm
My phone's call Log says I had a call: "incoming call - 2 days ago" When I click on that call the call details say the call was actually made on Sunday July 1st at 8:42pm.
So in other words the call wasn't received "2 days ago" it was received 5 days ago. The call log is wrong! Thanks Google!
This makes the call log useless for me. I have to open the call log and click on Details for every call to see when it was actually made if I want to know when a call was placed or received.
So am I upset at Google, am I upset at Andriod??? AM I upset at both?? Is the new Google Blogger interface all that bad?
Maybe... or maybe it is just me. If the user interfaces for Google products actually made sense to someone like me, an average user, then I could accept the change and improvements with all their bugs and problems...
Unfortunately this isn't the case. Google has across the board created an online environment isn't user friendly, is overly complex to use for what it does and all around "broken what didn't need to be fixed".
Blogger wasn't perfect my any means but now it is trash thanks to the Google team 'Improvements'. Honestly if Goggle had come in a simply fixed what was wrong with Blogger (a few minor tweaks) I would be right there with them cheering them on, even if there were a few bugs.
But because Google decided to change everything and in the process mess up things that used to work, change around menus that were easy to use, move simple "one click" tasks down to places I don't want to click... and gave me a phone that has a useless and messed OS... instead of making things easier, rather they have made things harder...
Because of everything they have done, I am done with Google.
Showing posts with label Everything Miscellaneous. Show all posts
Showing posts with label Everything Miscellaneous. Show all posts
Thursday, July 5, 2012

Saturday, March 3, 2012
USS Iowa in Richmond CA
A few of weeks ago I visited the USS Iowa anchored in Richmond CA. The USS Iowa is a battleship that not only served in several wars but also has a unique history. Currently out of service the ship is being renovated to be a history museum and ultimately will be anchored in Southern California. My family and I decided that while the ship was in Richmond we should take the opportunity to go see her. Below are a few photos that I took while we were on board. Unfortunately only the bow of the ship was open to the public but just having the opportunity to go on board was outstanding!
_6.JPG)
Thursday, January 26, 2012
Update On What I have Been Up To
It must be obvious by now that I have not been updating my Blog for a couple of weeks (maybe more?!). In the past I have been pretty regular with my posts publishing about one a week. Recently that steady stream has stopped because I have not had any spare time to mess around since Christmas. I have been busy with other things and have not had the time to do any projects or experiment in the garage :-(
I do have some projects that I was working on and I have received some emails asking me to add more detail and explain some of the things that I have done. I'm going to answer those emails with new Blog posts and finish the projects that are in the works - stay tuned!! I'll have some new info soon!
Check back and you will be surprised... :-)
I do have some projects that I was working on and I have received some emails asking me to add more detail and explain some of the things that I have done. I'm going to answer those emails with new Blog posts and finish the projects that are in the works - stay tuned!! I'll have some new info soon!
Check back and you will be surprised... :-)
Thanks for reading my Blog and continuing to read it!
- Otto Belden
Sunday, January 8, 2012
Toyota Highlander Door Panel Lights
I was driving the other night down a dark road and I tried to adjust the mirrors of my Toyota Highlander. I couldn't see the mirror adjust switch, I know more or less where it was but it was so dark I couldn't find the switch. A similar experience happened to me after I got in my car in a parking lot and wanted to lock the doors, I couldn't see the door lock rocker switch and although I knew where it was and I pressed it I wasn't sure if I had locked or unlocked the doors. The Toyota Highlander switches aren't lighted! Today I fixed that by adding a couple of small lights to illuminate the dash area to the left of the Toyota steering column and the drivers side door panel. This little project was a pretty straight forward thing to do and it turned out pretty nice. I only wish that Toyota had added lights to these switches on the base model so I didn't have to do this.
The first thing that I did was lift up the switch panel in the drivers door using a guitar pick to pry up the panel. A guitar pick (or a the corner of a credit card) works nicely to lift up car trim because it won't mark of mess up the plastic panels. The switch panel lifts up and unsnaps from the rear.
 |
| 2009 Toyota Highlander Drivers Switch Panel |
Once I had the switch panel lifted up I removed it and released the harness from a plastic retainer inside the door. Releasing the harness didn't disconnect it from the switch panel, it just freed up some slack in the wired so I could pull the panel out. The switch panel has a bunch of wires of various gauges going into it and I probed around with my meter to find a couple that had power when the engine was running.
Friday, December 30, 2011
Happy New Year (Merry Christmas too)
I have not posted here in a couple of weeks because I have been really busy with the holidays and working. Those two things have prevented me from doing any experiments, projects or writing new posts. This weekend is of course New Years and Last weekend Christmas so I just want to say Happy To You for both those events. I'll have something new next week, so check back then!
Meanwhile you can always read about some of the other things that I have built by clicking HERE. Enjoy!
- Otto
Sunday, December 11, 2011
Eucalyptus Walking Stick With Epoxy
I spent a lot of time this week doing things other than working on my projects so I'm going to write a brief post about a walking stick that I made not too long ago. This is a stick that my son and I found while walking around a creek near our house. There are a lot of eucalyptus trees in the area and also a lot of sticks naturally. This stick is about an inch in diameter (more or less) and about 4 feet long. The end that eventually became the handle was "crackled" and dark as if it had been used as a poker in a fire.
My son and I thought that it looked neat and we walked around with it all day. Since there are so many sticks around the creek area there we figured that taking one home wouldn't be a problem. Once we got it home we sanded it smooth and got all the loose bark off of it.
 |
| Walking Stick With Epoxy Back Fill |
Once we got all the loose stuff off with rough sanding and a stiff wire brush we did a bit more smooth sanding with #200 grit sandpaper. There are a lot of neat little crackled features (and a few big cracks) in the stick that made it a bit rough ever after the sanding. To fill those in we mixed up some grey two part epoxy and smeared it all over the wood, working it into the cracks and leaving it as smooth as we could leave it with gloved hands.
Click the jump below to read a little bit more and for a close up picture of the handle end of the stick.
Sunday, December 4, 2011
Homemade Lab Jack (Part 2)
I have almost finished the Lab Jack that I started recently, actually it is done and it works! I wrote a PART 1 post about his project and I recommend that you read it if you are interested in how this got going and why I built it. I decided to build this after I looked around for commercially available products and decided that they were too expensive or not big enough for what I wanted. Besides, if you build it yourself it is exactly what you want! Below is a picture of the completed lab jack extended to over 12 inches in height.
 |
| My Home Built Lab Jack |
Can it go higher than twelve inches? Yes it can but it gets really unstable due to the 'play' in the hinges. I'm going to fix that and I'll write a post about how I fixed it soon. This project worked out better than I expected. It's very easy to raise the height by turning the adjustment knob (detailed below) from the lowest height of 2-1/4" all the way up to where you see it in the picture. The only problem is in the 'slop' in the hinges that I used to make it. Being the first Lab Jack that I have built I have to call this a success.
Check out THIS LINK to see some of the other stuff I have built.
Sunday, November 20, 2011
Wind Tunnel Smoke Generator
A couple of weeks ago I wrote about the details of my home made wind tunnel and I wanted to add some recent modifications I made to the smoke generator system. The smoke generator that I am using is a Halloween fog generator and I modified it by attaching a hose to the outlet (and rewired it!). There are some details about that in THIS post. I had a problem with that setup because the smoke (or fog if you want to call it that) coming out of the generator was hot and it melted the plastic tubing that I had attached to the generator. Check out the post above that I linked to for details. A second problem was that the smoke was being blasted right through the wind tunnel in bursts. I only had a few seconds to make an observation with smoke! Another problem that I had was the liquid that is used to make the fog was condensing in the tube that I attached to the output and that condensed liquid was filling the tube and creating back pressure. The tube was essentially being blocked by the condensed liquid, getting hot and finally burst. I decided that I wasn't going to run this smoke system any longer without addressing those issues (and cleaning up my garage).
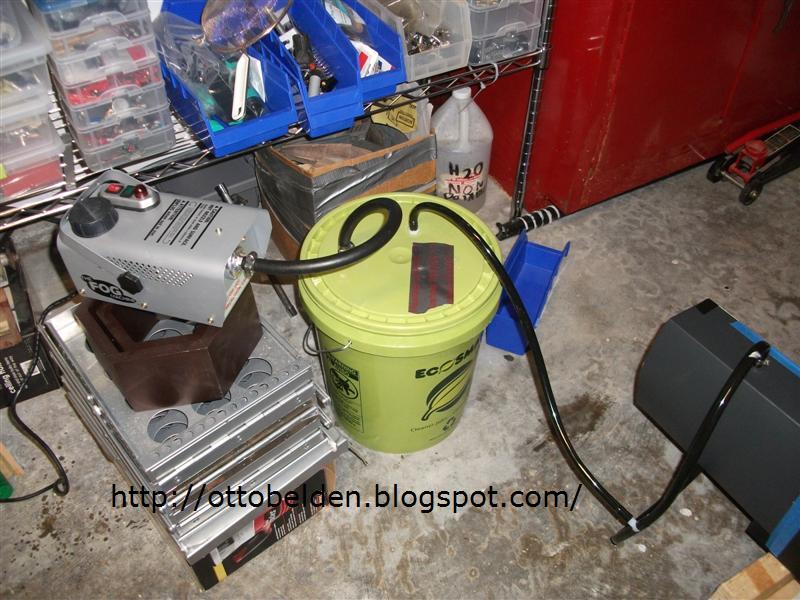 |
| Smoke Generator Accumulator Tank |
What I came up with is shown in the picture above. I got a 3 gallon plastic paint bucket and attached a couple of barb fittings to the lid. On one of the barb fittings I ran some 3/8" fuel line hose from the smoke generator and on the other fitting the plastic hose feeds the wind tunnel. You can see the wind tunnel in the lower right corner of the above picture.
Saturday, November 12, 2011
Electric Bike Design
I wrote a post HERE in September about a electric bike that I designed, the E-Moto Monterey Electric Bike. There were a couple of pictures from the Las Vegas Interbike trade show that looked nice but didn't really highlight the unique features that this bike has. Below are some better shots of the finished product and some comparisons to the original CAD design that I did using SolidWorks.
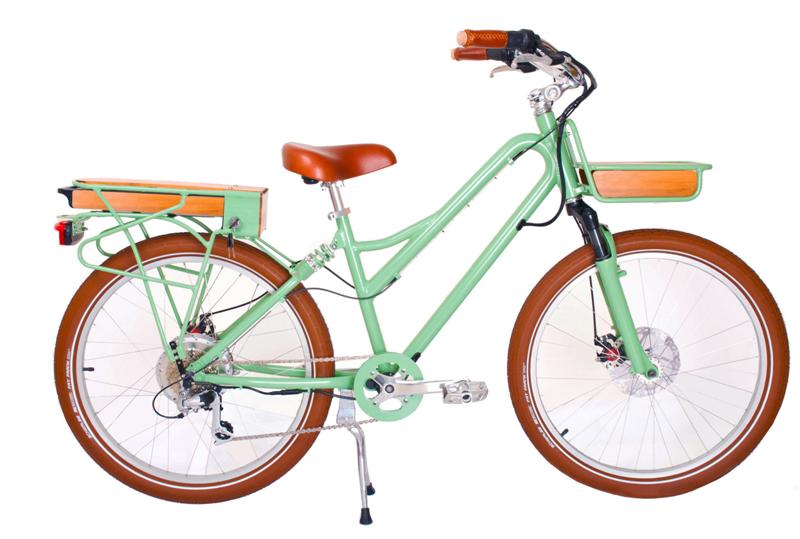 |
| Monterey Electric Bike (real photo!) |
 |
| Monterey Electric Bike (CAD Model) |
You can see some differences if you look really close between the CAD model design and the finished product. In case you can't see the differences I have more closeup pictures below!
Sunday, November 6, 2011
Wind Tunnel Details
I was sick with the flu this week so I didn't get very much done. I really wanted to do some more experiments with the Plasma Actuator that I wrote about a couple of weeks ago HERE but due to the illness and the cold spell we have had recently I stayed out of the garage. Because of several emails that I have received asking about the wind tunnel, I decided to write a little about the wind tunnel that I built and used for those tests. HERE is the original post that I wrote about building the wind tunnel that has most of the construction details. Below is a picture of the results that I got with the tunnel.
 |
| Airfoil Plasma Actuator in my Wind Tunnel |
In order to see the airflow I added smoke (fog) to the airstream using a Gemmy Fog Machine. HERE is a link to their website for the model that I picked up at WalMart for about $25.00. The Fog Machine heats up and sprays a mist of glycol and water for about 60 seconds into a heating tube and the result is fog. As the mist is sprayed into the heating tube the tube cools down and the machine stops spraying until the tube can heat up again. I didn't like that so I took the Fog Machine apart and modified it so that it produces fog when I press the button and stops when I release the button. It's always fun to take apart brand new stuff!
Sunday, October 23, 2011
Plasma Actuator Airfoil Wind Tunnel Testing
This week I built a Plasma Actuator in the shape of a crude airfoil and tested it in my Homemade Wind Tunnel. Plasma Actuators are research devices that use an electric field to change the characteristics of gas flow near a surface. In this experiment I was trying to get the airflow over the top of the airfoil (wing) to adhere to the surface of the airfoil when it normally wouldn't. Separation of the airflow over the top of a wing causes the lift generated by the wing to be reduced resulting in a stall. Before I talk more about what I built let me put a couple of pictures that I took from my experiment to help explain what I'm writing about.
 |
| Airfoil in Wind Tunnel Plasma Actuator Off |
 |
| Airfoil in Wind Tunnel Plasma Actuator On |
The above pictures were taken one after the other with the same airflow, the only difference between the two is in the lower picture the Plasma Actuator is turned on. In the lower picture the flow over the top of the wing is much smoother than in the top picture and is adhering to the top of the wing. Read more below for some details about the Plasma Actuator that I built and a video of it running.
Sunday, October 9, 2011
San Francisco Fleet Week
I like airplanes, ships and standing in long lines fun day trips and I got my fill this weekend. So I went to the 2011 San Francisco Fleet Week on Saturday. It was a lot of fun and I took a bunch of pictures, I'm going to put a few of the good ones here. The USS Carl Vinson (CVN-70) and the USS Bonhomme Richard (LHD-6) were two of the most notable ships there as well as the Blue Angles and many other aircraft. There are tons of pictures, news articles and info. about San Francisco Fleet week on line so I'm not going to put a lot of that here. If you want to know more about SF Fleet Week Google it. Because this Blog is about the things that I am doing I'll stick to what I did. BTW: I am still working on the wind tunnel that I wrote about last week but I don't have a lot of progress to write about.
To get to San Francisco we took the East Bay Ferry from Oakland to San Francisco. This is the way to go to avoid traffic and standing on BART. We left Oakland and went straight to San Francisco. On the return trip I took the picture below of a crane on the Alameda waterfront. I thought it looked neat with the moon right off the end of the crane boom.
 |
| Alameda Pier Crane |
Old mechanical stuff like that looks neat and I really like the picture so I put this one first. It's rusted and looks like it's about to fall over but it appears to be in service. The Ferry leaves from the post of Oakland and I have only one interesting picture of the ship that is right next to the ferry.
Sunday, October 2, 2011
Homemade Wind Tunnel for Plasma Actuator Testing
I finally got around to putting the wind tunnel together, well actually it's a breeze tunnel. There isn't much of a wind blowing through it! After looking at the performance of the Bladeless Fan I built I decided that it was going to create a higher airflow than I need for the Plasma Actuator experiments that I want to do, so I decided to slow it down a bit and use a small DC fan. The DC fan is easier to use because I can control the speed of the air with a variable power supply and the airflow from the Bladeless fan just dropped off all together when I lowered the input air. This wind tunnel is only to do some experiments with the Schlieren setup I built and High Voltage and a low velocity and variable airflow is what I need. Before I built this wind tunnel I did a lot of reading on line and found some plans from a NASA wind tunnel site describing a small classroom wind tunnel for students to build as well as a lot of very technical information about "real" wind tunnel design. As I mentioned above my wind tunnel is more of a breeze tunnel so I didn't need a lot of the flow control, settling areas and velocity constrictions. I just need something to provide a smooth flow of air past a viewing area. Below is what I came up with.
 |
| Homemade "Suck Down" Wind Tunnel |
In the picture above the airflow is right to left, the fan is on the left, the view area is in the middle where the glass windows are and the inlet air goes into the right side. Because the fan is downstream of the test area this is considered to be a "suck down" tunnel. One advantage of a "suck down" tunnel is the turbulence and chopped up air created by the fan isn't blowing over the test area. Smooth air is sucked past the viewing area. Click below to read more!
Sunday, September 25, 2011
Interbike 2011 Bike Show and the E-Moto Monterrey Bike that I designed
The Las Vegas Interbike trade show happened on September 14-16 at the Sands Expo and Convention center. One of the (best) electric bikes shown there was the e-Moto Monterey electric bike that I co-designed in SolidWorks with a friend of mine. Although I wasn't able to go to the show I thought that I would write a blog post about the bike since I had a hand in creating it. Have a look at the pictures below of the Interbike show bike and the CAD model that I made to design the bike.
 |
| e-Moto Monterrey at the Interbike 2011 show |
 |
| SolidWorks CAD model of the e-Moto Monterey bike |
Details of the bike and all it's features are below. I did the entire design in SolidWorks 2009. A friend of mine who is familiar with the bike industry and trends was advising and critiquing along the way.
Sunday, September 18, 2011
Bladeless fan construction
Yes I am building a wind tunnel... and the biggest problem in doing so is getting rid of turbulence from the air source, in this case a fan. So to do that I am building a fan (air source) that should have a limited amount of disturbed air. What I want is a smooth airflow into the test area and a bladeless fan seems to be the obvious choice..
I built a fan like this before HERE but didn't provide too many details of the construction. This time I built a slightly bigger fan and have provided all the details in a neat video.
Enjoy!
Email me with questions or leave a comment... There is a lot more to come on this topic so stay tuned...
Sunday, September 11, 2011
Latest project, wind tunnel and a plasma actuator
I'm building a wind tunnel in my garage. Doesn't that sound neat? My interest in this is probably obvious because of several posts that I have dome thus far related to Plasma Actuators. The experiments that I was doing with my homemade Schlieren setup and specifically the high voltage experiments HERE and HERE among others.
The idea is to build a wind tunnel and place a plasma actuator inside it and watch what happens as the air is passing over the actuator. Comparing it in the 'on' and 'off ' states and various voltages. The wind tunnel has two windows so I can put the Schlieren setup on each side. Additionally I want to use a smoke generator and lasers to visualize the airflow. Check out THIS video to see what I mean about the lasers and smoke.
What does all this mean? I ask myself that question frequently, hourly sometimes but the answer is "I don't know!" That is why I am taking the time to build this setup and because it's a rather complicated project I don't have any neat pictures and videos to post yet but stay tuned they are on their way. The wind tunnel by itself is a significant amount of work and of course the plasma actuators are too. A lot of work and the devil is in the details so I'm paying attention to them (more or less).
After having read everything that I can about both wind tunnels and plasma actuators I have some specific things that I want to try. I'll detail each of those in the next week or two and post some neat pictures and videos.
Monday, September 5, 2011
My New Phone a Samsung Replenish
This week has been busy for me and I haven't had a lot of time to play in the garage. One thing that I did manage to do was get a new phone, a Samsung Replenish and mess around with it and the Google App Inventor for Android. My old phone was a Palm and I loved it but it was really old and time to retire it to the box of phones and chargers that I have in the closet. I'm new to the Smart Phone craze and having a phone that is smarter than I am is a new experience for me. Should we really even call these things phones? It's interesting that it is called a phone but when you start to type a phone number it immediately does a web search for the number and not dial the person who you are trying to call. I think this is more like a hand held computer that also makes phone calls.
 |
| My Samsung Replenish |
My first impression of the phone was how tricky the touch screen is to operate. As I mentioned I'm new to this but having to 'flick' my finger on the screen to move around isn't easy. I find myself selecting things rather than moving them especially when the screen is listing a bunch of options. I want to scroll down to see more options but instead I select one of them while trying to move. I'm getting better at it but it isn't intuitive and requires a lot of practice. The good think about the Replenish is there are arrow keys on the keyboard that let you move around without having to touch the screen. I can't imaging having to operate the phone without a keyboard.
Sunday, July 31, 2011
Another Battery Powered LED Light Tree
I was in a store in Monterrey CA that sells these really nice 'light trees' last year and I thought that it would be fun to try and make one myself. The first one I made one from scratch, buying all the parts at a hobby store along with LED Christmas Lights, and I wrote about it HERE, (an exciting video of how I made it is HERE). Anyway I was asked to make another LED Light Tree because the first one that I made turned out really nice ;-) When I went to the hobby store again to buy the parts I noticed that they are now selling LED Branch Lights pre-made! This is great because the majority of the effort in making the first LED Branch Light was making the branch itself with all the LED Christmas lights added into it. Check out the above link to see how I did it (or watch the video). I didn't have to do that this time but there were some other interesting things that I discovered while making this one with the pre-made LED branch.
 |
| Homemade LED Branch Light Tree |
Above is a picture of how this LED Light tree turned out. Looks nice doesn't it? Click on the READ MORE link below to see the parts list and how I built this as well as something interesting I noticed in the battery pack for the LED Branch Light.
Sunday, July 3, 2011
Water Worries, Sprinkler Debugging and Water Traps
I thought that I would write this week about something that I have seen many times and fixed many times. Sprinkler Valve Wiring. Why is the wiring so complicated and always seems to be messed up? I don't think that this post will answer that question (or any others) but it is a good time to share my experiences with sprinkler valves and maybe something that is only related by virtue of the fact that is involves water (more about that below).
Some people reading this may know that I recently moved into a new home a few miles from where I had been living for several years. This new place is the first for me that in quite some time actually has a lawn and sprinklers to water it. After living here and settling in I decided to see what days the sprinklers were programmed to water and how much water I was paying for to keep the lawn fresh and green. To do this I of course started by checking the programming on the sprinkler controller and placing a low pan on the lawn to catch the water. The pan is to see how many inches of water is being delivered to the lawn per sprinkler cycle.
 |
| Bad Sprinkler Valve Wiring |
So I turned on the sprinklers and waited for the pan to fill up with water. The lawn only has two 'zones' or valves so I thought this would be quick. The first valve opened and the sprinklers spränkled like they should, all the little droplets of water going everywhere you might expect them to. Then when it came time for zone two to turn on nothing happened. I looked at the valves and the wires a little closer and found what you see in the above picture. The duct tape was a nice touch but to find out what was wrong click on the read more below...
Saturday, June 11, 2011
Homemade Ranque Hilsch Vortex Cooling Tubes: FAQ
One of the most popular things that I have done and blogged about is the Ranque Hilsch Vortex Tubes that I built. I get a lot of emails asking a lot of questions about RHVT’s and how to build them. There are no easy cut-and-dry answers to most of these questions because there are so many variables involved when building one, but there are some generalizations that can be made. Recently I decided to put together a FAQ page and with the help of a colleague and on line collaborator: Théo M. we have tried to answer some of the questions people have asked me. I am not at all an expert on these things and only know what I know by reading information online and from my own experiments. If you are planning on building one of these please look around at all the information the net has to offer and by all means contact me if you have any questions. At the end of this post I have placed some links that I have found useful.
As always when working with anything potentially dangerous (like compressed air) always wear appropriate protective gear like safety glasses and know what you are doing. If there are any questions that you may have that are are not in this FAQ or not answered clearly please email me at ottobelden@yahoo.com or leave a comment and I’ll be happy to answer you!
 |
| Homemade Vortex Tube Instructions from THIS post |
If I get more questions in emails and comments on my blog I'll answer them below in this post and update the date below. I'll highlight any new info in the post so it will be easy to find.
FAQ UPDATED: 7/21/11
Check back often if you are curious or after you ask me a question. I'll answer you directly and add your question and answer to this post. Continue reading for the FAQ's and links!
Subscribe to:
Posts (Atom)