This is a rather ambitious project and by ambitious I mean it might not work. On many occasions I have needed to adjust the height of something, usually a camera, in very fine increments. A tripod works really good for that and I have one... but a lab jack would be much better so I decided to build one. Also a lab jack is a nice thing to have!
There are three industry standard approaches to designing a lab jack. One is THIS where there is a scissor lift that has to slide in a track relative to the platforms. One disadvantage is that it becomes less stable as the height grows. Another design is the Dual Pantograph like THIS that is a bit more stable but requires a lot more linkage's. A much more stable design uses three linkage hinge's in THIS type of configuration. With this one there are two opposing linkages and a third to add stability. This last configuration is what I decided to build.
 |
| Homemade Lab Jack |
The above picture shows how much progress I have made at this point. Not much! You can see the opposing hinge systems and the location of where the third will be. The wood that I am using is Baltic Birch plywood, the same wood that I used in my clock. There is a 1/4-20 all thread bolt running through the hinges and that was the tricky part of this project.
As I mentioned above I'm not sure how well this will work. What I am worried about is the stability of the platform when it is raised up. Intuitively I believe that because all the force is downward any 'slop' in the linkages and hinges won't matter too much. I'll have to finish it to see if that is true.
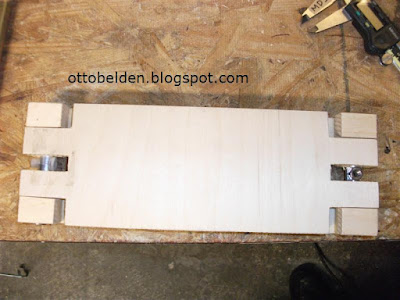
The first step of this project was to glue the 3/4 inch ply wood to the half inch wood that makes the hinge. The hinge's are 4" wide and the 3/4 inch pieces are 1-1/4 inches wide. Take a look at the photo below.
 |
| Homemade Lab Jack Hinges |
Nothing fancy going on here. Just some wood blocks glued to the ends of a couple of other pieces of wood. I let that sit for a night and in the meantime I drilled a couple of holes through 1/2" aluminum rod that I had laying around. The 1/2 inch rod will be the hinge pins and the holes in the rod are for the 1/4-20 inch threaded rod. Does this make any sense?
 |
| The Hinge Pin with a 1/4-20 Nut |
The 1/4-20 nut slips into a slot that I filed in the 1/2" hinge pin so that it can't spin. You might get the idea from the above photo. Imagine a pocket filed into the horizontal pin that holds the nut.
 |
| Drilling The Holes In The Hinge Pins |
One of the hinge pins has a pocket filed out for the nut and the other one had a clearance hole for a nylon bushing. Having one pin threaded (with the nut) and the other one a clearance home (with the bushing) isn't the best design because the threaded rod will move outside the lab jack when it's at it's highest position. A much better design is to use a reverse thread on one hinge so the rod unscrews from one side as it screws into the other... but the added complexity of that isn't something that I wanted to deal with. It's OK if the threaded rod sticks out a bit past the side of the jack when it's at it's highest position.
 |
| Hinge Components |
After the glue had dried and the hinge pins were drilled I laid it all out for the picture above. The hinges have been cut out and the hinge pins cut to length and drilled from the aluminum rod.
 |
| Match Drilling Holes For The Hinge pins |
Fit the pieces together and match drill some holes. I clamped the wood hinge pieces to the table to hold them in place while drilling holes for the hinge pins. I'm still wondering at this point of this is going to work.
 |
| Test Fit Of The Lab Jack Hinge |
Fitting it together before cutting the hinge pieces in half. Looking closely you can see the hinge pins are installed with the 1/4-20 nut on the right and the nylon bushing on the left. Once I was sure this all fit together correctly and smoothly I cut the hinge's in half.
 |
| Partially Assembled Lab Jack |
Here it is partially assembled. The brass hinges are set into pockets that I cut in the base. I'll add some details about this as I finish this project and let you know how well it works (or why it didn't) next week,
Me gustan tus trabajos Otto. Son siempre auténticos retos, se trata de trabajos minuciosos que requieren una gran técnica.
ReplyDeleteCasi siempre me sorprenden.
¿Cómo va tu reloj?
Un cordial saludo
Ramón
Ramón,
ReplyDeleteGracias - me gustan tus blogs tambien - both in English and Spanish ;-)
Voy a hacer un post de mi reloj en el futuro. Nada mas necisito tiempo a hacerlo, pero si esta bien!
- Otto
Concordo com Ramón , são trabalhos com detalhes bem elaborados e projetados.
ReplyDeleteParabéns Otto
Alex
From Brasil
Gracias Alex!
DeleteCan you post the lengths of every piece for this project looking to build one my self looks pretty challenging. Thanks in advance!!
ReplyDeleteAnonymous,
DeleteNo I can't post anything anymore. I had a hard time just replying to your comment with the new crappy Blogger interface that Google has ruined. I'm looking into moving my blog to another hosting service because Google sucks.
Sorry to sound so negative but that is how I feel about what Google has done...
Otto