This week I have had more time to work on the Gaming - Chess and Checkers table that Otto Jr. and I am making. I wrote a bit about this table last week HERE and in a couple of other posts but to summarize this table is made from an old table base and a salvaged table top. We decided that it would be fun to not only build a table but to try and inlay a playing field into the table. The obvious and probably the best way to do this would have been to get some dark and light colored wood and glue it together into a laminated block like a butcher board then glue the table pieces around it. Once that was dome we could plane and sand the whole thing flat and have a nice gap free smooth surface for the table top. But because when one is working with salvaged stuff and making it up as you go along along that isn't what we happened. Last week you may remember that we bought the table round blank at a garage sale then cut up some 1/4 inch thick by 1-3/8 pine finishing board into 64 square pieces. Last week we applied a clear coat to 32 of them and stained the other 32. The dark stain is a Minwax Jacobean color and the pieces were soaked to make them nice and dark. The clear coat was Minwax Polyurethane high gloss clear.
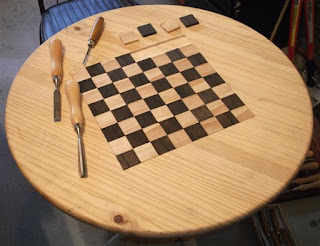
Since then I used a router to cut out a squarish area in the center of the table and cleaned it up with some wood carving chisels. I intentionally undercut the size of the hole with the router so I could because it is less precise and used the chisels to get in close and make a nice fit for all the playing field pieces. I decided to cut the playing field hole at an angle to the grain and lamination of the table top to give it some visual interest. Also for the same reason the grain of the light and dark square pieces of the playing field are alternating at right angles to each other.
Above is a picture of how it turned out as I was finishing the chisel work. As I mentioned above this isn't the cleanest way to do this because it is very hard to make all the pieces flush with the table top but I got it really close. Because I am using stained wood for the dark areas I can't really sand it all smooth because the sanding will cut through the stain and make them light. Oh well...
After Getting the square hole to just the right size I sanded the table itself with 100 grit sandpaper and stained it with Minwax Sedona Red wood stain.
Here it is with the playing field pieces glued in place flush to the table surface. Now that I can see both the stained and unstained pictures I think it might have looked pretty good without the wood stain, again I'll say Oh well... Once it dried overnight i sanded it lightly with 1500 grit paper to bring out a little more of the wood grain and to help the clear coat stick once I put it on. I am planning on putting several coats of clear on there to help even out the edges of the playing field because they are not 100% flush and never would be no matter how much fine fitting I try to do.
On to the table base... I sanded the entire base down with 60 and 100 grit paper to get all of the paint stripper off that I applied HERE in this post. Unfortunately the paint stripper and the primer that was used to paint this table is really impregnated into the wood so the stain didn't soak in too evenly. After a couple of coats and wiping off I decided to just apply an even coat of stain and let it dry like paint. They say you should not do that in the instructions but I never listen to the instructions and I have had good results in the past with this approach.
Above is a picture of the table base stained with the Sedona Red Minwax. All that is left now is to give it a light sanding and attach the table top to it. Once that is done I can start with the clear coats of the high gloss polyurethane.
This table isn't turning out the way I had envisioned but so far I am happy with it. In hindsight I would have made the entire thing from scratch and used different colors and types of wood instead of all pine and gone for a more wood grain enhancing finish rather than a defect hiding approach but either way it's a fun project so far.


No comments:
Post a Comment